Step by step beginner’s guide to wordPress blogging 2023-2024
Here I’ll gladly inform you about how to start a wordpress blog 2023-2024 | beginner’s guide to wordpress blogging.
So, you too, want to become a blogger? Try something new? Face a new challenge? Great! Maybe you’re excited to get your voice heard or want to use a blog to generate passive income.
I’m not going to lie and say that it’s easy to build your blog to become profitable, but you have to start somewhere.
Professional bloggers make money because they’ve found a way to build an audience and sell those audience products on other people’s behalves (that’s affiliate marketing), sell their own products, or sell ad space on their site.
But, the great thing for you is that you don’t have to worry about that yet.
In this guide, I’m going to teach you how to set up a WordPress blog from scratch and explain why you should choose WordPress as your blogging platform.
I’m going to guide you through the 10 steps you need to go through to get started with a brand-new WordPress blog.
So, if you are a beginner to WordPress blogging, get a cup of coffee, and let’s dive in.
I know that starting a blog can seem overwhelming and intimidating. This free guide is all about blogging for beginners and will teach you how to become a blogger with just the most basic computer skills. So whether you’re 8 or 88, you can create your own blog.
I am not ashamed to admit that when I was first learning how to build a blog I made a ton of mistakes. You can benefit from more than a decade of my experience so that you don’t repeat these same mistakes when you make your own blog. I created this free guide so that a complete beginner can learn how to blog quickly and easily.
Read Also: Simplest Ways To Make Money Legitimately Online
How to start a WordPress blog on your own in six simple steps:
- Choose a blogging platform.
- Pick a blog name. Choose a descriptive name for your blog.
- Get your blog online (hosting). Register your blog and get hosting.
- Get started with WordPress
- Design your blog, i.e. choose the right free theme
- Add posts & pages.
- Write & publish your first post. Share your thoughts with the world. The fun part!
- Promote your blog. Get more people to read your blog with the proper marketing.
- Make money blogging. Choose from several options to monetize your blog.
1. Choose a Blogging Platform
The blog platform is, in simple terms, a service or software (like WordPress) designed specifically to allow you to publish your content online.
Free Platforms
Many people think that setting up a blog is very difficult. That’s why free blog platforms are so popular (such as WordPress.com, Tumblr, Blogger, or Medium). They offer free publishing and running services for your blog.
You create an account, and you can start blogging. You do not worry about your blog hosting or domain name, and you do not have any fees. There is only one thing that is very unfavourable to you: in fact, your blog does not belong to you. You do not influence anything; you’ll never be able to make money from your blog.
Self-hosted Platforms
To create your website or start your WordPress blog, you can do everything yourself. And believe me, it’s not so complicated.
The best and the only right solution is to have a self-hosted site for your blog. That is web hosting, your own domain name, and free CMS.
If you want to start a blog you should create a self-hosted blog. To do this you need three things: blog hosting, domain name, and a content management system (CMS), thanks to which you can manage your website through a simple user interface (update, extend or add posts, video or audio content, etc.).
What is a CMS?
A Content Management System, CMS is a software that allows you to manage your site (update it, expand, add posts and individual pages, etc.) using a simple user interface.
Among the most popular content management systems, I can mention WordPress, Joomla, or Drupal. You must have heard these names before.
WordPress – best free Content Management System
Of the many free CMS, I recommend WordPress, which you can download from WordPress.org (don’t do it now, we will do it together in the following part of the article)
- it’s 100% free (you only need a web host & domain name, but this will be discussed later),
- very easy to use, especially for beginners,
- very popular
- the most important thing is that it is a self-hosted CMS, which means that you are the owner of your content; you are managing it by yourself. No one will remove the content you have created without your permission. You decide by yourself what kind of advertisements appear on your blog or how you make money on blogging. This gives you the opportunity of flexibility as well as the opportunity of controlling your own work, and this is what it’s all about, right?
WordPress.org vs. WordPress.com
Almost identical names, but completely different functions.
Before we go any further, you must know that WordPress.org and WordPress.com are two completely different platforms based on the same free and open-source content management system (called WordPress).
WordPress is a free and open-source content management system (CMS) that is available on the WordPress.org website.
On the other hand, WordPress.com is a blog platform with a hosting service that works on a modified version of WordPress.
What are the differences between WordPress.org and WordPress.com?
WordPress.org:
- Your Website and all its data belong to you.
- Full control of your website – you can do everything you want to customize the page to what you need.
- Complete management of the database and files.
- Full freedom in adding ads.
- The ability to add free and paid plugins and themes.
- You can create your own online store or sell membership for premium content.
- Possibility of using tools like Google Analytics.
- You have full SEO control.
- Direct access to files (FTP/SFTP/etc. – depends on hosting provider – good for development).
- Direct access to the database (phpMyAdmin/Adminer/etc. – depends on hosting provider – good for development)
WordPress.com:
- They place ads on all free sites, so you have to go to a paid plan to delete them.
- To delete powered by WordPress.com, you have to go to the Business plan.
- No possibility of adding your own ads.
- There is no way to add your own plugins (allowed in a paid plan).
- You can not install your own themes (allowed in a paid plan).
- You cannot use such tools as Google Analytics (allowed in a paid plan).
- Building any membership sites with WordPress.com is forbidden.
- Creating your online store is possible only in the E-commerce paid plan.
- SEO tools are not available in the free plan (allowed in a paid plan).
- They can delete your content without your consent if they think you’ve broken the rules.
- No access to files.
- No access to the database.
WordPress.org is the best solution for starting a blog
You want to be a blogger. You want to share something valuable with others, and the content is the thing that matters to you the most. It has to captivate the readers and spark their interest. Why start a blog if you don’t control your content? It does not make sense.
Don’t let anyone control your content!!!
That’s why you shouldn’t waste your time on free-of-charge blogging platforms, such as WordPress.com, Tumblr, Blogger, or Medium, especially if you are serious about blogging.
These types of platforms control your content, have a lot of constraints, and contrary to what you may think, it is challenging to relocate the content, which you have been creating there for years.
So, what steps are ahead of you?
First, you’ll select the name of your blog and pick a domain name (that is the address of your blog). In the next step, you will choose a hosting provider, and you will buy hosting (so that your new blog has a place of residence). Finally, you will install WordPress, to which you will be able to publish your first post.
Seems complicated? It is not so, do not worry. Step by step, we’ll go through all these stages; you’ll see how simple it is. In the end, you will be the owner of your blog. And you’ll be able to teach others how to start a WordPress blog.
Now, let’s move to the second step on how to start a WordPress blog; we’ll take care of the name of your blog.
Step 2. Pick a blog name
Choosing the right name for your blog will be your most challenging task today. But I have some tips for you that I hope will help you get through it easily.
How to choose a good domain name
Your blog’s name is crucial because it will become your brand. Users will associate it with you. Therefore, it should be easy to remember and related to the content of your WordPress blog.
The domain name should distinguish you from the competition – it should be short, and simple and leave a good, lasting impression.
Let’s not pretend that choosing the right domain name is an easy task. It requires some thought, but don’t be put off – others can do it, you too. Do not give up!
If you already have a blog name, skip this step, and install free blogging software to start a WordPress blog.
Here are some quick tips:
1. Do not use numbers and hyphens
They are difficult to remember. All additions disrupt the fluidity of the name. They make a user wonder where to place them, and therefore, the risk of making a mistake increases.
2. Select the .com extension or national extension
Select the .com extension – the most popular and recognizable, or national (like .us, .uk, .fr). The choice of domain name extension depends largely on the target market of your site. If you are only interested in the local market, you can use the popular national extension operating in your country (.us – USA, de. – Germany, .uk – United Kingdom, etc.). They are appreciated in local markets but are not necessarily known around the world.
3. Easy to say, easy to spell and, above all, easy to write
The name should be catchy to remember easily. It is also useful if the user can enter it in the search browser from memory.
It should be easy for people around the world to remember. Easy to say, easy to spell, and, above all, easy to write.
4. The name should be short
Preferably one word, which can be difficult because most of these domains are taken. It should have a maximum of 3 words.
5. Use your name
You can use your name. If you’re starting your WordPress blog or personal website, consider using your name. It is also an excellent strategy for building a unique brand.
6. Avoid general names
You can use the keyword. But remember names that contain only keywords are too general and therefore difficult to remember. e.g., Domains carrental.com or rentalcar.com. I have the impression that they are the same. And you don’t want to get lost in a crowd of similar, competitive domains. You always have to remember that a domain name is essential but not the most critical thing, so don’t waste too much time searching for it.
7. Avoid trademark infringement
Always, make sure the name you choose is not a third-party trademark. It can cause serious legal problems that will cost you a lot of money.
8. Use a domain name generator
If you are not inspired, use a domain name generator. It’s a great tool that generates many new domain names based on your recommendations and thus stimulates the mind to think and create. The generator will help you collect the best ideas and add some new ones. You do not need to use names to be generated. You will find that new ideas will appear.
Stick to these simple rules, and look for unique but easy-to-remember names. When creating a domain name think globally, unless you want to focus on the local market, in which case you should think locally. Remember that both of these markets have their own rules.
When creating a new WordPress blog or a new website, pay attention to the fact that a domain name can help users remember it. However, the most important is the content, product, or service that you want to share with others, not the domain name itself. These things, together with your domain name, create an unforgettable, well-known, and unique brand many times chosen by users.
Now we can move to the third step on how to start a WordPress blog for beginners – finding a hosting provider.
Remember
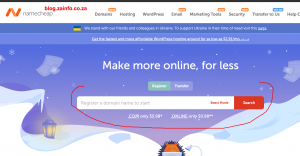
you will first check if your domain name is available.
on hosting platform, check for the availability of your domain name. see example below on Namecheap’s homepage
hosting platforms
The hosting market is quite extensive so you will find many hosting platforms. Some of them are worse, others better. In my opinion, hosting platforms that are worth considering are:
- Namecheap (www.namecheap.com)
- Bluehost (www.bluehost.com)
-
IONOS (www.ionos.com)
Note: don’t be bother about the unknown, these hosting provider customer care(especially Namecheap) are always avialable, if there is anything that is complicated to you, feel free to contact them, they will help you in fixing it, they can even help you in installing wordpress and literally everything. Bluehost has the advantage over other web hosts in that it has ‘Automatic WordPress Install,’ which makes it much easier when you take the first steps in WordPress. after logging in to the new Bluehost account, WordPress is already installed. That’s great. these journey is fun guys!
Now let’s move on to the fourth step of how to start a WordPress blog – get started with WordPress.
Everyone wants to make the best choice and be recognized and successful, that’s clear. To be honest, you never know if your domain name will win the hearts of users, but don’t worry about it.
Install WordPress
So now you are in the WordPress dashboard. Congratulation!
Note: You can access your new blog’s dashboard by going to www.yourdomainname.com/wp-admin (where “yourdomainname.com” is your domain name and www.yourdomainname.com/wp-admin is your dashboard).
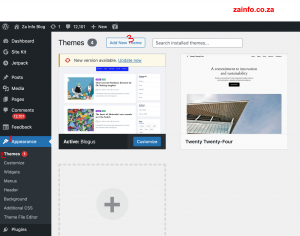
Choose a theme
Don’t panic, it’s very simple, WordPress offers more than 5000 free themes and more than 53,000 free plugins. It means that you have a wide selection of options, and you will surely find something for yourself.
On the right, you can type the name of the theme, which you know and search for the most suitable theme for you among the other screened ones.
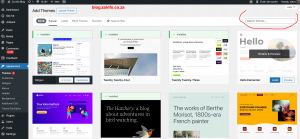
How to install a free theme
On the wordpress.org site you can freely see the Theme Homepage as well as the theme’s demo, get to know the author, see his other projects, and read about other people’s opinions.
There are a lot of free themes, and you can lose plenty of time searching for the perfect one. Choose something that you will love, something that will suit you and your readers’ tastes.
After you make up your mind, click Install and then Activate.
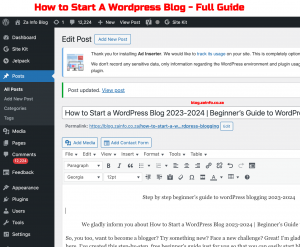
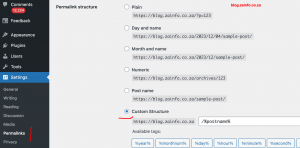
Change your permalinks
Permalinks are fixed and unique URL addresses of particular posts, pages, categories, or tags on your WordPress blog site. The permalink is visible in the top browser bar. It is nothing else but an internet address making a link from a post published on your blog.
When you are installing WordPress, you are installing default settings at the same time, so it is important to remember that some of those settings should be changed before you start to blog. After installing WordPress, the first thing you should do is change the permalink structure.
How can you achieve that? Don’t worry, it’s straightforward.
Enter Settings < Permalinks and choose Post name
Add Plugins
A WordPress plugin is a piece of software that “plugs into” your WordPress site. Plugins can add new functionality or extend existing functionality on your site, allowing you to create virtually any kind of website, from ecommerce stores to portfolios to directory sites.
Plugins can make small tweaks on your site or massive changes, depending on their features. For example, you could use a plugin to add a WhatsApp share button to your site or to create a fully multilingual site. Or, if you run an ecommerce business, you might install a plugin to assist with payment gateways or allow visitors to book appointments online.
There are also plugins that can help you enhance your contact forms, make beautiful sliders, backup your site in case of data failure, and make email opt-in easy — plus much more.
While many make changes to the front end of your site, some plugins make changes on the back end so maintenance is easier for your team. These plugins might allow you to scan your site for broken links, run A/B tests, or put your site into maintenance mode, for example.
WordPress offers more than 53,000 free plugins. It means that you have a wide selection of options, but I will list the ones you really needs below:
- Akismet Anti-spam
- Advanced Editor Tools
- Classic Editor
- Classic Widgets
- Jetpack
- Yoast SEO
- Wordfence Security
- Site Kit by Google
How to Install Plugins:
chill, don’t be discouraged is not hard.
There are various ways to install a WordPress plugin, depending on where you got it from.
The first is the automatic method, which allows you to install plugins right from the WordPress admin area. The plugin directory is built into every WordPress core software for instant access.
- From your admin screen, go to Plugins → Add New. You’ll find a gallery of plugins that you can install on your WordPress site. Use the search bar to find a specific plugin easily.
- After you find the one you want to install, select the Install Now button. For example, we will show you how to install Akismet, an anti-spam WordPress plugin with more than 5 million active installations.
- Once the installation is complete, click Activate to turn on your new WordPress plugin.
You can also manually install WordPress plugins that you’ve downloaded from other third-party sources. WordPress allows you to upload, install, and activate plugins in ZIP format.
However, be careful as many cyber attackers take advantage of plugins as a way to attach malicious code to websites. Before you install WordPress plugins, always make sure that the plugin source is trustworthy.
- Download the ZIP file of a plugin from a trusted source.
- Go to Plugins → Add New.
- Select Upload Plugin.
- Drag and drop or choose the ZIP file that you have downloaded on your computer.
- Click the Install Now button and wait until the upload is complete.
- Select Activate Plugin.
Edit general settings
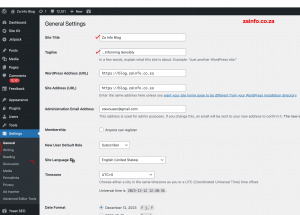
Go to Settings > General and change some necessary settings for you. Enter Site Title and Tagline, add the correct email address. Set the correct timezone. It is according to this setting that the scheduled posts will be displayed. You can also look at the writing and reading settings (Settings > Writing, or Settings > Reading) and adapt them to your needs.
General settings are always available, and you can change them again whenever you need it.
Let’s move on to the fifth step of how to start a WordPress blog and take care of the appearance of your blog.
Step 5. Create a blog – Designing your WordPress blog
Finally, you can take care of your website’s appearance. In my opinion, this is the most enjoyable part of creating a blog.
One of the most significant advantages of creating your blog using WordPress is that you are provided with free themes and plugins.
WordPress offers more than 5000 free themes and more than 53,000 free plugins. It means that you have a wide selection of options, and you will surely find something for yourself.
Step 6. How to start a WordPress blog – Adding Posts and Pages
At this point, you have a fully operational and well-configured blog with your theme and your domain. Now you know how to start a WordPress blog. Your blog is now ready for work. At this moment, the question “How to start a WordPress blog” is not so mysterious anymore. Big relief right :)?
Now, it is time to get to know WordPress. I will show you where to start?
6.1. Writing Blog Posts
You can add a new blog post in three ways (choose the one you prefer) from the Dashboard:
- Dashboard > Write your first blog post or
- Dashboard > +New > Post or
- Posts > Add New
You will see a minimalist screen that can be divided into several areas. I will describe these in brief:
1) Option bar
A set of the most necessary tools to help you work with the document during editing: adding a block, undoing changes, and outlining a document.
2) Publishing Options
Here you can publish or save a draft of your article. You can also see what your post looks like before publishing it by clicking on the Preview button.
By clicking the cog icon, you will hide the settings sidebar.
You will also find here the ‘More tools and options’ button (the one with three dots). Here you will find many attractive options that will facilitate the use of the new editor.
3) Document and Block Options Settings
In the Document settings, you can set the visibility of your post. You can share it with everyone publicly, and you can set your post as private or password-protected, so only those with the password can view this post. You can also schedule the publication of your post later, setting a specific date for its release.
In this section, you can also mark the post as sticky, and you can change the post’s formats, add a category, tags, Featured image, Excerpt, and set up Discussion.
Clicking any block will bring you to the block settings on the right side of the screen. Depending on the type of block you choose, its settings will change.
4) Content Area
As the name suggests, this is the place where you put your content. Now you can start writing your first post.
6.1.1. Add Title & Permalink
Enter the title of your post in the ‘Add title’ field. Please pay attention to the permalink before continuing.
A permalink is a permanent and unique URL for individual posts, pages, categories, or tags on your blog site. This is nothing but the internet address of your post that makes it visible on the internet.
Learn more about What are permalinks
After adding the title, the permalink will appear. To see it, click again on the title. The permalink will appear above.
You can change it by clicking the ‘Change Permalinks‘ button. Do this before saving the post. You can also change the permalink in the Document Settings on the right, in the permalink tab.
GOOD TO KNOW
Everything that you publish on your website (a post or a page) has its own unique URL address (permalink), which makes it visible on the Internet. If you change the URL address of an already published post, the previous address, which you might have shared on social media or other sites, will not work.
Be careful about changing the permalinks of the already published content.
It makes a massive difference for your browser, whether you will write an address such as this one https://blogonyourown.com/support/ or this one https://blogonyourown.com/supports/. These are two different pages, with two separate URL addresses.
6.1.2. Writing your content
Then write the content in the place ‘Start writing or type.‘
Remember that each paragraph is a new block, so when you hit enter, a new block will be created.
You can also add a new block by clicking on the ‘+’ icon, which you can find in various places.
You can always change a given block to another one, for example, after writing the text you want to be a header – click the ‘Change block type or style‘ icon and select ‘Heading.‘
Save Your content
In the end, you must save your first post, but do not worry; you don’t have to publish it immediately – that is, show it online. WordPress gives you the option to save your post as a draft/sketch, invisible on the web.
You can publish or save a draft of your article using the publishing options (top right). You can also click the Preview button to see how your post looks before publishing.
In the document section, you can specify whether the post should be public, private, or password-protected. You can also choose the date of its publication.
Choose one of the options to save your post. Of course, you can edit your document at any time, remember always to save the changes you have made.
To Sum up:
- To publish your post, click the ‘Publish’ button, located on the right side.
- Click the ‘Save Draft’ button to save the draft version of your post.
- If you want to make your post private or password-protected choose the right option from The Post Visibility.
- To schedule, a later publication of your post choose the date of its publication in the document section.
6.2. Adding images, links, pdf files, and videos
6.2.1. Adding an image
Adding an image is very simple. Add a new block by clicking the ‘+’ icon, search the ‘Image’ block in the list and select the photo from the Media Library, or upload the file from your computer.
Then customize it using the basic settings found on the top of the image (align left, right and center) or on the right in ‘Block Settings‘.
In the Block Settings on the right, you can find Image settings like alternative text, image size, image dimensions, and link settings.
Adding Caption and alt text
To optimize the image, you need to add a Caption, Alternative Text (Alt Text) and an Image Title (optional). Where to find them if they are not in the Image Block Settings on the right?
If you want to learn more about image optimization in your blog, read the article: Optimization of images in WordPress. How you should do it and why it is so important
To add a Caption or to change the Title of the image, click the Edit image icon (pencil icon above the picture), make changes, and then click Select or ‘x.’
You can also go to Media > Library, click on the image you are interested in, fill in the appropriate fields, and leave the site by clicking ‘x.’
Imagine that a blind person is searching through your site using a screen reader, which will read everything but images. Describe your pictures by giving them a description using AltText, and your whole content will be available for everyone.
6.2.2. Adding links
In the blog editor, links are created in the same way as in other well-known editors.
Select the text, click the ‘Link’ icon at the top, then paste the URL into the field and press the ‘Apply’ icon to accept.
To open the link in a new browser window, click the ‘Link Settings’ icon and then click the ‘Open in New Tab’ button.
6.2.3. Adding video, audio and pdf files
To insert audio, video, etc. on your WordPress blog, copy the URL and paste it into the editor. WordPress will automatically convert it to the embed block.
To see all available block settings, you have to click the mouse on the block area.
You can also add a block by clicking ‘+’ Add Block > Embeds and choosing from the long list what you want to insert and then paste the URL. The new block editor has a lot of different Embed blocks.
If you want to insert audio, video, or pdf files that are not already on the network (files have no URL), go to ‘+’ Add block > Common Blocks > select Audio, Video or File and upload your file.
6.3. Adding tag/tags and category/categories
Tags and categories are a crucial element of your blog because they organize the content, group it into specific sections, and allow the reader to find articles that he is interested in.
But how do tags and categories differ?
6.3.1. Categories
Consist of the main topics, which can be found on your blog and which create your blog’s main structure.
The average blog has about 7-10 categories. It’s not beneficial for a blog to have more categories, because then it becomes confusing and unreadable.
In the WordPress blog, you can find the categories or tags on the right in the Document Settings section.
To add a new category, click the ‘Add New Category’ link. To add tag write the tag in the field and hit enter.
You can manage your categories or tags by going to Dashboard > Posts > Categories or Tags.
6.3.2. Tags
They are very similar to categories, but they serve as a more detailed description of your post. Tags divide your posts into groups, regardless of the structure, which a category has.
Let’s suppose that your blog is about cooking. You are writing an article about a lemon-flavored sugar-free lemonade:), which you will put it in the category: Refreshments and tag it: lemonade, lemon, sugar-free.
If someone is interested only in your sugar-free recipes, then they will be able to find them by clicking on the tag ‘sugar-free easily.’
Tags divide your posts into groups, so if you do not plan on publishing more sugar-free recipes (which would be tagged ‘sugar-free’), then it’s better not to use this tag at all. Using a specific tag for only one post doesn’t make sense and only creates a mess.
6.4. Adding ‘About me’ page
As with the addition of posts, there are also three ways to create a page in a WordPress blog:
1. Desktop > Add page Information or
2. Desktop > + New > Page or
3. Pages > Add new
About me page is one of the most viewed pages, so it should be well-prepared. It’s worth putting effort into it:).
Because the new editor is a total novelty, I can even say a ‘revolution’ for many people, WordPress – to meet the users – allows you to use the classic editor with a plugin.
If you want to use the classic editor, you must first install the ‘Classic Editor plugin. To do this, go to Plugins > Add New and enter the ‘Classic Editor‘ in the search window. Then click the ‘Install Now’ button and then ‘Activate‘ and you can start writing your first post.
Good luck with blogging.
Read Also: Simplest Ways To Make Money Legitimately Online
REMEMBER
- You can always change your hosting provider and relocate your website.
- It is better to have a HORRIBLE domain and start a blog than to search for months and never start.
- Themes are responsible for the website’s appearance, plugins – for its functionality
Important: This Article is not complete, I’ll soon update this page for more info, kindly save the page and check back soon.
Note: If you need help, or you have questions or corrections regarding this post, kindly use the comment box below.
The article is inspiring.
Good I love this
Nice post.
Nice one
This is impressive
Awesome 👍
Informative and helpful
Nice
Nice post
Fantastic
Very nice very nice article
This article is amazing and interesting
Nice one there
Nice
Beautiful
This is a good site
Amazing note
.nice
Well detailed piece!
Good one
Good
Great
Good
Easy to comprehend.
Nice
Nice
Keep up the good work stevoe
Thanks for shared this information
Nice 👍
Wonderful
Nice 👍
Good
Nice one
It’s a welcome development, nice and wonderful information
Just nice
Very nice
Nice
Nice update
Great 👍
Nice
Its Good to be here
Interesting
Nice
Interesting….
Nice one
Extraordinary
Nice
Nice
Nice
Nice one
Nice
Nice
Very nice
Exceptional blog for real
Whenever I need important information I useally come to this site
That’s good
That’s awesome
Good references
Educative and informative
Fantastic.
Impressive ✌️
Impressive article✌️
NICE
nice
Thank you for the good information
Nice
Nice
Thank you for sharing ♥️
lovely
Nice
This was informative.
Nice one
Good
Educating
Incredible
Good idea for creating an opportunity for those struggling with blogging to have a good foundation
Wonderfull
Ok
Easy to Understand
Great
Wonderful
Interesting.
Great work. Exquisite.
Very good piece of work
This is nice
This is great
Fantastic
Great Work. Keep it up.
Good work.
Nice one
Thanks for the enlightments
Great Post
Nice
very informative
Very interesting
Good to know
Awesome
Very impressive
Good
Good
Really great article.
Is time consuming
A very helpful information
It’s really an interesting and a nice move. I’m really proud of you
Good
Good article